First, before I removed the panel from the boat’s framework, I traced the lines of the chines, sheers, and frame to the inner surface of the plywood. That way, I would have an easy visual reference for where to spread the epoxy. I also drew reference points on both the plywood and the chine to help align the panel when it was time to put it back on.
I removed the panel & set it aside, and staged all the items I’d need nearby: chip brush, extra latex gloves, awl, clamps, screwdriver, and the silicon bronze screws. I kept extra screws close at hand just in case I stripped any screw heads. This time, I put some old newspaper down on the floor to catch any drips of epoxy... right next to the earlier dried globs that I’m going to have to sand off of the concrete at some point.
 |
| Planking panel removed & waiting for epoxy. |
 |
| Frame outlines made a great reference for spreading the epoxy. |
 |
| Waiting for epoxy. |
 |
| Some of my alignment was a bit off when I drilled into the sheer. Ill have to be more careful next time. |
 |
| Same drilling alignment issue with the transom frame. |
 |
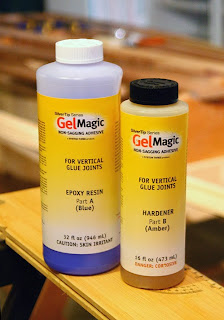
| The GelMagic components are color-coded. |
Wearing 2 layers of disposable latex gloves, I roughly aligned the panel with the reference marks I’d made earlier, and held it in place with one clamp. The Irwin spring clamps are great for this, as the springs in them are quite strong. Next, I used the awl to align the first holes, adjusting the clamp as necessary. I hand-threaded the first screw, then changed gloves to avoid getting too much epoxy onto my screwdriver.
After driving the first couple of screws, I clamped the rest of the panel into position. Hand-driving the screws went very smoothly. I found that using a ratcheting screwdriver with an oversized handle is just ideal for this task. I also found that I’d over-beveled some of the holes, as a few of the screw heads went slightly below the surface of the plywood. I’ll create less of a bevel next time.
With the panel fully “glued and screwed” into place, I used the putty knife to scrape away excess epoxy from the areas where I’ll need to join more wood: the chine and sheer where the forward planking panel will butt up against the aft panel; and the interior joints of the chine and sheer to the aft panel where the backing piece for the butt joint will be attached. I then used the putty knife to fill the screw holes with epoxy.
It was while using the putty knife that I realized the major component of this process that I’d forgotten:
A rag.
Thankfully, the laundry basket was nearby.
There’s one less item I’ll have to wash, dry and fold. Hopefully, however, I will remember to get shop rags next time.
 |
| Alignment marks & filled screw holes along the chine. |
 |
| Excess epoxy was scraped away from the chine so it wont interfere with fitting of the forward panel. |
 |
| The small gap on the side of the transom is now filled. |
 |
| Seam of cured epoxy against frame #1. |
 |
| On the interior seams, I scraped away excess epoxy so it wont interfere with fitting of the backing block for the butt joint. |


0 komentar:
Posting Komentar